How to Cut Plywood With a Circular Saw Without Splintering
Making Circular Saw Cuts
From cutting wide baseboard to framing a roof, these techniques make angle cuts easy and accurate
 Family Handyman
Circular saws can do more than just rough framing. With the techniques in this article you can make perfect angle, miter and even compound miter cuts.
You might also like: TBD
Smooth right-angle bevel cuts

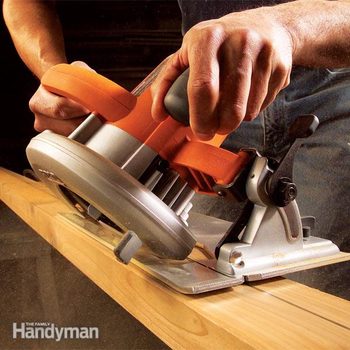
Photo 1: Set depth of cut
Start by adjusting the depth of cut. Unplug the saw, retract the blade guard and set the saw on your board. Adjust the saw's base plate until the blade extends past the bottom of the board about 1/4 in. Tighten the depth-adjusting lever.

Photo 2: Hold the Speed Square tight
Line up the front of the blade with the cutting mark. Slide the Speed Square against the base plate and then hold it tight against the board.

Photo 3: Make the cut
Keep the saw's base plate tight against the edge and slide the saw through the cut. Let the short cutoff drop free.

Photo 4: Keep the saw steady
Maintain firm contact between the back of the saw base plate and the square until the saw blade completely clears the board.
Cutting wide baseboards or fascias to form a tight, clean corner joint requires a perfectly square and straight bevel cut on the end of each board. Slide miter saws and radial arm saws work great for this type of cut. But with practice, you can make a near perfect cut with a circular saw too. The key is to use a guide. A Speed Square makes a perfect saw guide for 90-degree and 45-degree cuts.
After you've lined up the blade and positioned the square, hold it firmly to prevent it from slipping. If you're having trouble, try clamping the square to the board. Start the saw and nick the board with the blade to make sure it's aligned exactly with the mark. Reposition the square slightly if necessary.
Pay close attention to keeping the saw's base plate aligned with the edge of the square. A common mistake is to lift or twist the saw at the end of the cut, which results in a wavy cut. Steady, straight ahead follow-through is the key to avoiding this problem.
Smooth angle cuts
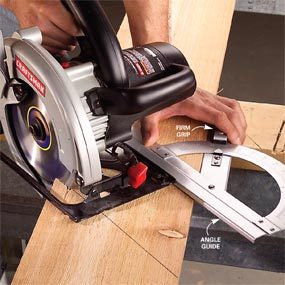
Photo 1: Line up the saw and guide
Align the blade with the cutting line and slide the square up to the saw's base. Grip the guide firmly against the board.
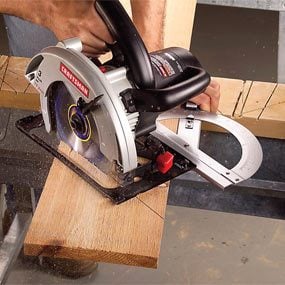
Photo 2: Push into the cut
Slide the base plate against the guide and push the saw firmly into the cut. There will be initial resistance from the blade guard.

Photo 3: Keep the saw moving smoothly
Concentrate on keeping the base plate tight to the guide and the saw moving at a constant speed throughout the cut.

Photo 4: Complete the cut
Complete the cut by moving the saw steadily forward while keeping the back of the base plate in contact with the guide.
Deck boards, deck railings and fascia boards often require angle cuts, and the neater you make them, the better your job will look. As with the beveled cut we showed previously, the key to smooth angle cuts is using a guide. We found this large, protractor-like angle guide at a woodworking supply store. It has an adjustable arm that allows you to set the angle and a wing nut that you tighten to lock it in place.
The trick to this type of angle cut is getting started cleanly. You'll have to push firmly at first to overcome the resistance of the blade guard. Then use the same cutting technique for angle cuts as we showed for right-angle bevel cuts. Adjust the blade depth, line up the cut and make sure to keep the saw's base plate in contact with the guide for the entire cut.
Rough compound-angle cut
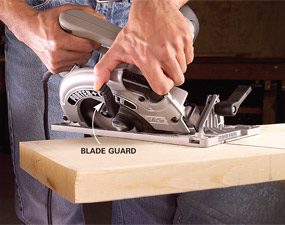
Photo 1: Pull the blade guard up
Retract the blade guard as you start the cut. Align the saw blade and the mark on the saw's base plate with the cutting line and start the cut.

Photo 2: Release the guard
Release the blade guard gently and continue the cut. Keep the saw moving straight along the line until the saw blade clears the board.
Rough cuts are the ones you make when you're framing a roof or wall. They need to be accurate, but they don't need to be pretty, so you can cut them freehand without a guide. To make this cut, set the saw to the desired bevel. Then draw the angle across the board and cut along the line.
The key is to make sure the saw blade is parallel to the cutting line when you start. Many saws have a set of notches or marks on the front of the base plate to help in aligning and guiding the saw for freehand cuts. Line up both the saw blade and the mark on the saw's base plate with the line to cut parallel to the line.
The blade guards on most circular saws tend to push the saw away from the line when you enter the board at an angle. Hold the blade guard up when you start the cut to eliminate this problem.
Rough beveled rips

Photo 1: Mark the cut
Mark the rip width on the board and line up the end of the tape with the mark. Pinch the tape and slide it along the edge of the board while holding a pencil tight to the end of the tape.

Photo 2: Secure the board
Tack the board to the sawhorses. Set the saw to the desired bevel and set the blade depth to 1/4 in. deeper than the thickness of the board. Saw along the line using the notch or line on the saw's base to help guide the cut.
Once in a while, you'll run into a situation requiring a beveled cut along the length of a board. Long cuts parallel to the grain are called rips, and table saws are the usual tools for ripping boards. But a circular saw also works great for rough rips. In fact it's often easier and safer to move the saw along the board than to wrestle a long heavy board through a table saw.
The first step is to draw a line along the board. The technique we show in Photo 1 below results in a line that's parallel to the edge of the board, even if the board isn't straight.
The board has to be held in place while you rip it, but clamps would get in the way. The solution is to temporarily nail or screw the board to sawhorses. Be careful to place the nails where you won't hit them with the saw blade.
Required Tools for this Project
Have the necessary tools for this DIY project lined up before you start—you'll save time and frustration.
You'll also need an angle guide.
Similar Projects
How to Cut Plywood With a Circular Saw Without Splintering
Source: https://www.familyhandyman.com/project/making-circular-saw-cuts/
0 Response to "How to Cut Plywood With a Circular Saw Without Splintering"
Post a Comment